
Today we’re going to be taking a look at how to construct a proper Valheim chimney in the new early access open-world survival game Valheim now the reasons you might need a properly functioning chimney in this game because in order for you to use a bed and rest in the game it must be near a campfire that way your character doesn’t freeze overnight.
You’re required to have a campfire inside your house and keep in mind as you design your house that your bed must be within four squares of your campfire in order for them to operate properly but the game doesn’t make it that simple if you are completely close in your roof so that you’re protected from any type of weather and storms the campfire will fill the house with smoke and begin damaging your character.
If you decide to remove a section of roof from above your campfire so the smoke has somewhere to escape anytime that it rains it will put the campfire out and keep it extinguished and if you decide simply to remove a single piece of roof from your house that is not directly above the campfire it will let the smoke dissipate through that opening however anytime it rains or there is heavy weather in the game it can still get inside your house if you are standing anywhere near that opening so this is still not ideal.
The pieces of material you’ll need to construct a proper chimney are:
- 12 wooden posts
- 7 full walls
- 5 half walls
- 1-floor piece
- 1 peak piece
- 3 stairs to work
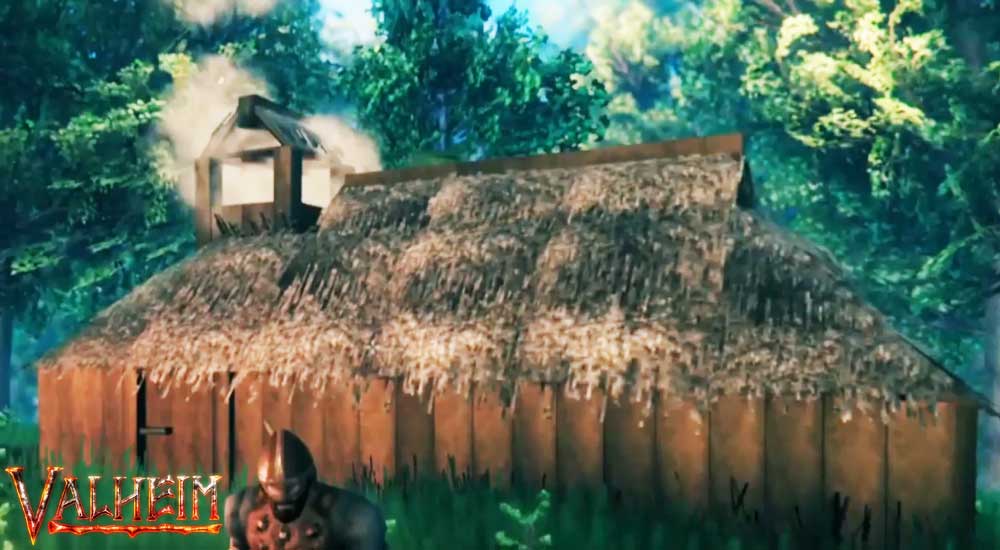
As a sort of scaffolding system to build the higher parts of this and the final product with this chimney will allow the smoke to dissipate outside of the house protect it from any type of weather by having a roof above the chimney and for any role play purposes, it’ll keep up off of your back if they come around for a surprise inspection.
The first thing we’re gonna do is have the chimney on the ground and use three of our full walls to surround it on all but one side you will use the final four full walls you have to close in all four sides one level above that and then you will use your 12 posts on the four corners to create stability up on the higher levels until you are three levels high during this entire process.
You may have to attach some form of stairs to the edges of your chimney so you can climb up higher and be able to properly place these items once all 12 posts are placed you will then add half walls on top of your previous full walls leaving you with one extra half wall that last half wall will be added to any of the sides to make it a full wall that way you can place a floor piece above the final posts and then delete that half-ball out of the way and this will leave you with a venting section for your chimney.
The final thing is to just add a peaked roof on top of that chimney to give it a stylish look and complete the weatherproofing of it most masonry chimneys are required to meet the 3 210 roll meaning it needs to be three feet above where it penetrates the roof and two feet above any portion of the building within 10 feet of the chimney as you can see once we’re on top of the house it looks like we have met that given that each wall piece seems to be about six feet tall we have plenty of clearance.
It looks fairly stylish well guys there you go if you were looking to have a more stylish look for your fire inside your house without getting smoked out that is a basic chimney you can build very early on in the game so that all the smoke funnels out of the house and you can still use it to rest and cook food on the fire while it is storming outside.